Python for Data Science Series - Python environments with pyenv and poetry
Introduction
Python, a versatile programming language widely embraced in fields such as web development, data science, machine learning, and scientific computing. However, navigating through different Python installations and dependencies can often become overwhelming. On this post we will explore how tools like pyenv and poetry can simplify this process by effectively managing project dependencies. Let's embark on this journey of optimizing code environments together!
Why Python?
According to the 2022 stack overflow developer survey, Python is one of the most widely used programming languages today. Of 71,467 responses, 68% of developers expressed that they love the language and are planning to continue working with Python, and approximately 12.000 of those who haven't got the chance to use it have expressed their interest in starting developing with it. Its popularity is mainly due to its simplicity in syntax, expressiveness, and versatility. We can use Python to create any kind of software, from web applications to scientific computing.
Python also has PyPI package index,a python package repository, where you can find many useful packages (Tensorflow, pandas, NumPy, etc.), which facilitates and speeds up your project's development. In PyPI, you can also publish your packages and share them with the community. The ecosystem keeps growing fast, and big companies like Google, Facebook, and IBM contribute by adding new packages.
The Python Package Index, abbreviated as PyPI (/ˌpaɪpiˈaɪ/) and also known as the Cheese Shop (a reference to the Monty Python's Flying Circus sketch "Cheese Shop"), is the official third-party software repository for Python. It is analogous to the CPAN repository for Perl and to the CRAN repository for R.[1]
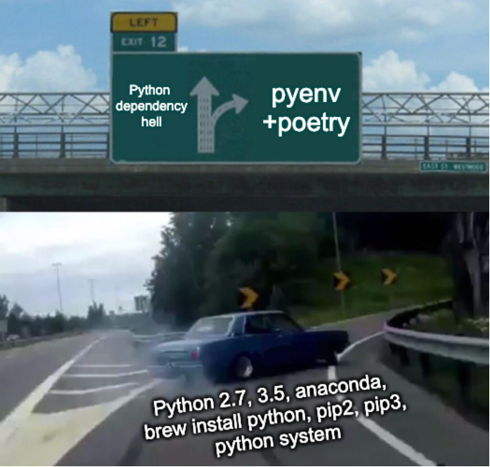
Python Dependency hell
Well, it sounds like Python is amazing! However, if you have been using Python for a while, you may have already noticed that handling different python-installations and dependencies(packages) can be a nightmare! An issue commonly known as dependency hell, which is a term associated with the frustration arising from problems managing our project's dependencies.
Dependency hell in Python often happens because pip does not have a dependency resolver and because all dependencies are shared across projects. So, other projects could be affected when a given dependency may need to be updated or uninstalled.
On top of it, since Python doesn't distinguish between different versions of the same library in the /site-packages directory, this leads to many conflicts when you have two projects requiring different versions of the same library or the global installation doesn't match.
Thus, having tools that enable us to isolate and manage our project's dependencies is highly convenient. In this post, I will show you how to use pyenv and poetry to create your code environments.
Virtual environments to the rescue!
A Python virtual environment is a separate folder where only your project's dependencies(packages) are located. Each virtual environment has its own Python binary (which matches the version of the binary that was used to create this environment) and its own independent set of installed Python packages in its site directories. That is a very convenient way to prevent Dependency Hell.
Python virtual environment allows multiple versions of Python to coexist in the same machine, so you can test your application using different Python versions. It also keeps your project's dependencies isolated, so they don't interfere with the dependencies of others projects.
There are different tools out there that can be used to create Python virtual environments. In this post, I will show you how to use pyenv and poetry. However, you can also try other tools, such as virtualenv or anaconda, and based on your experience, you can choose that one you feel most comfortable with. the video below will provide you with more information about these kinds of tools.
Pyenv
pyenv is a command line tool which allows you to install and run multiple versions of Python in the same machine. For those who come from a javascript background, pyenv is a very similar tool to nvm.
Setup & get started with pyenv
You can follow the steps below for installing pyenv on macOS or check the documentation for alternative installation methods.
After having installed pyenv, you can then install any python version running the command pyenv install <version>.
if you are not sure about which versions are available to be installed in your machine, you can run the command pyenv install --list.
You can run the command pyenv versions to check which Python versions have been installed.
To set the default version of Python to be used, you can run the command pyenv global <version>. This version will be used when you run python or python3 in your terminal.
Alternatively to the pyenv global command, Sometimes you want to set a specific version of Python to be used within a specific folder. You can create a .python-version file in the folder and set the version you want to use, or by running the command pyenv local <version>. pyenv will then use this version when you run python or python3 in the folder.
To make sure what python version is being used by pyenv, you can run the command pyenv version.
Poetry
Poetry is a tool that allows you to manage your project's dependencies and facilitates the process of packaging for distribution. It resolves your project dependencies and makes sure that there are no conflicts between them.
Poetry integrates with the PyPI package index to find and install your environment dependencies, and pyenv to set your project python runtime.
To install poetry we follow the steps below:
If you were able to run the previous commands, we can then move forward with the rest of the tutorial.
To ask poetry to create a new project, we use the command poetry new <project name>.
This will create a new folder with the name <project name> and a pyproject.toml folder inside it.
If you already have a project, and you want to use poetry to manage the dependencies, you can use the command poetry init. So, poetry will add the pyproject.toml file to your project.
The main file of your poetry project is the pyproject.toml file. This file defines your project's dependencies(python packages) and holds the required metadata for packaging. Poetry updates this file every time a new python package is installed. By sharing this file with others, they can recreate your project environment and run your application. To do so, they will need to have poetry installed and run the command poetry install within the same folder where the pyproject.toml file is located.
Now we can start adding dependencies to our project. To do so, we use the command poetry add <package name>.
Now our pyproject.toml file looks like:
    [tool.poetry]
    name = "myproject"
    version = "0.1.0"
    description = ""
    authors = [`Henry Ruiz  <henry.ruiz.tamu@gmail.com>`]

    [tool.poetry.dependencies]
    python = "^3.10"
    numpy = "^1.23.1"
    pandas = "^1.4.3"

    [tool.poetry.dev-dependencies]
    pytest = "^5.2"

    [build-system]
    requires = ["poetry-core>=1.0.0"]
    build-backend = "poetry.core.masonry.api"
Lest review that file sections:
- [tool.poetry]: This section contains informational metadata about our package, such as the package name, description, author details, etc. Most of the config values here are optional unless you're planning on publishing this project as an official PyPi package.
- [tool.poetry.dependencies]: This section defines the dependencies of your project. Here is where you define the python packages that your project requires to run. We can update this file manually if it is needed.
- [tool.poetry.dev-dependencies]: This section defines the dev dependencies of your project. These dependencies are not required for your project to run, but they are useful for development.
- [build-system]: This is rarely a section you'll need to touch unless you upgrade your version of Poetry.
To see in a nicer format the dependencies of your project, you can use the command poetry show --tree. This command draws a graph of all of our dependencies as well as the dependencies of our dependencies.
If we are not sure at some point that we have the latest version of a dependency, we can tell poetry to check on our package repository if there is a new version by using “— latest” option
If we list our folder content, we will see that not only the pyproject.toml file is created, but also some other folders and files. So, let's take a look at the contents of the myproject folder.
├── .venv
│   ├── .gitignore
│   ├── bin
│   ├── lib
│   └── pyvenv.cfg
├── README.rst
├── myproject
│   └── __init__.py
├── poetry.lock
├── pyproject.toml
└── tests
    ├── __init__.py
    └── test_myproject.py

5 directories, 11 files
- `.venv`: This folder is created by poetry when it creates a virtual environment.It isolates the project from the system environment and provides a clean environment for your project. It contains the Python interpreter and your projects dependencies.
- poetry.lock: When Poetry finished installing the dependencies, it writes all of the packages and the exact versions of them to the poetry.lock file, locking the project to those specific versions.
Notice that this folder structure is created only if the poetry new myproject was executed. When poetry is initialized within a folder that already exists ( using the poetry init command), only the pryproject.toml and the .env folder are created.
You should commit the poetry.lock file to your project repo so that all people working on the project are locked to the same versions of dependencies. For more info, check this link : Poetry basic usage
Building our project and publishing it is just running the poetry build and poetry publish commands, so it is pretty intuitive. The publish command will submit our application to pip, so other developers can easily install it.
Hands-on tutorial
Creating a python package using poetry
In this section, you will learn how to create a simple python package named style_image with poetry. This simple python package takes two images, the style image, and the content image, and performs style transfer. "Style transfer is an optimization technique used to take two images—a content image and a style reference image (such as an artwork by a famous painter)—and blend them together, so the output image looks like the content image, but “painted” in the style of the style reference image."[2]
For our style_image package we will use the magenta/arbitrary-image-stylization-v1-256 model available in TensorflowHub under-the-hood.
So, let's do it!!
We will start by creating a new project called style_image using the command poetry new style_image.
Installing package dependencies
Next we are going to install the dependencies of our project, so we run the commands:
We will see that there is an error trying to install tensorflow:
Creating virtualenv style-image in /Users/haruiz/temp/style_image/.venv
Using version ^0.12.0 for tensorflow-hub
Using version ^2.9.1 for tensorflow
Using version ^1.23.1 for numpy
Using version ^9.2.0 for Pillow
Using version ^0.20.0 for validators
Using version ^0.6.1 for typer

Updating dependencies
Resolving dependencies... (4.2s)

SolverProblemError

The current project's Python requirement `(>=3.10,<4.0)` is not compatible with some of the required packages Python requirement:
- tensorflow-io-gcs-filesystem requires Python `>=3.7, <3.11`, so it will not be satisfied for Python `>=3.11,<4.0`
The great thing is that poetry generally provides information on how to fix them. For the error above, poetry suggests restricting the python property to >=3.10,<3.11 in the pyproject.toml file.
For tensorflow-io-gcs-filesystem, a possible solution would be to set the python property to >=3.10,<3.11
Make sure you always check the output in the terminal.
So the pyproject.toml file is now:
[tool.poetry]
name = "style_image"
version = "0.1.0"
description = ""
authors = ["Henry Ruiz  <henryruiz22@gmail.com>"]
readme = "README.md"

[tool.poetry.dependencies]
python = ">=3.10,<3.11"

[tool.poetry.dev-dependencies]
pytest = "^5.2"
black = "^22.6.0"

[tool.poetry.scripts]
style_image = "style_image.main:app"

[build-system]
requires = ["poetry-core>=1.0.0"]
build-backend = "poetry.core.masonry.api"
We can then try to install the dependencies again:
poetry add tensorflow-hub tensorflow numpy pillow validators "typer[all]"
After installing the dependencies, our pyproject.toml file is now:
[tool.poetry]
name = "style_image"
version = "0.1.0"
description = ""
authors = ["Henry Ruiz  <henryruiz22@gmail.com>"]
readme = "README.md"

[tool.poetry.dependencies]
python = ">=3.10,<3.11"
tensorflow-hub = "^0.12.0"
numpy = "^1.23.1"
Pillow = "^9.2.0"
tensorflow = "^2.9.1"
validators = "^0.20.0"
typer = {extras = ["all"], version = "^0.6.1"}

[tool.poetry.dev-dependencies]
pytest = "^5.2"
black = "^22.6.0"

[tool.poetry.scripts]
style_image = "style_image.main:app"

[build-system]
requires = ["poetry-core>=1.0.0"]
build-backend = "poetry.core.masonry.api"
Coding our style_image package
At this point, we are ready to start coding, let's create the folder structure below and replace the code in each .py file with the code on this repository https://github.com/haruiz/style_image:
    ├── README.md
    ├── README.rst
    ├── data
    │   └── content_image.jpg
    ├── main.py
    ├── poetry.lock
    ├── pyproject.toml
    ├── style_image
    │   ├── __init__.py
    │   ├── core
    │   │   ├── __init__.py
    │   │   └── style_image.py
    │   ├── main.py
    │   └── util
    │       ├── __init__.py
    │       ├── __pycache__
    │       └── image_utils.py
    ├── stylized_image.png
    └── tests
        ├── __init__.py
        └── test_style_image.py
Code :
- main.py
- core/style_image.py
- util/image_utils.py
- style_image/main.py
from style_image import StyleImage

if __name__ == "__main__":

    content_image_path = "data/content_image.jpg"
    style_image_path = "data/style_image.jpg"

    stylized_image = (
        StyleImage(style_image_path)
        .transfer(content_image_path, output_image_size=800)
        .save("stylized_image.jpg")
    )
import tensorflow as tf
import tensorflow_hub as hub

from style_image.util import ImageUtils
from PIL import Image as PILImage


class StyleImage:
    def __init__(self, style_image_path):
        self._style_image_path = style_image_path
        hub_handle = (
            "https://tfhub.dev/google/magenta/arbitrary-image-stylization-v1-256/2"
        )
        self._hub_module = hub.load(hub_handle)

    def transfer(
        self, content_image_path, output_image_size=384, style_img_size=(256, 256)
    ):
        """
        transfer the style of the style image to the content image
        :param content_image_path: image path of the content image :
        :param output_image_size: The content image size can be arbitrary.
        :param style_img_size: The style prediction model was trained with image size 256 and it's the
        recommended image size for the style image (though, other sizes work as
        well but will lead to different results).
        Recommended to keep it at 256.
        :return:
        """
        content_img_size = (output_image_size, output_image_size)
        # Load the content and style images.
        content_image = ImageUtils.load_image(content_image_path, content_img_size)
        style_image = ImageUtils.load_image(self._style_image_path, style_img_size)
        # Stylize image.
        stylized_image_tensor = self._hub_module(
            tf.constant(content_image), tf.constant(style_image)
        )[0]
        stylized_image_arr = tf.image.convert_image_dtype(
            stylized_image_tensor, tf.uint8
        ).numpy()
        stylized_image_arr = stylized_image_arr[0]  # Remove batch dimension.
        stylized_image = PILImage.fromarray(stylized_image_arr)
        return stylized_image
import functools
import tensorflow as tf
import os
import validators


class ImageUtils:
    @staticmethod
    def crop_center(image):
        """Returns a cropped square image."""
        shape = image.shape
        new_shape = min(shape[1], shape[2])
        offset_y = max(shape[1] - shape[2], 0) // 2
        offset_x = max(shape[2] - shape[1], 0) // 2
        image = tf.image.crop_to_bounding_box(
            image, offset_y, offset_x, new_shape, new_shape
        )
        return image

    @classmethod
    @functools.lru_cache(maxsize=None)
    def load_image(cls, image_path, image_size=(256, 256),
                   preserve_aspect_ratio=True):
        """Loads and preprocesses images."""
        # Cache image file locally.
        if validators.url(image_path):
            image_path = tf.keras.utils.get_file(
                os.path.basename(image_path)[-128:], image_path
            )
        # Load and convert to float32 numpy array, add batch dimension, and normalize to range [0, 1].
        img = tf.io.decode_image(
            tf.io.read_file(image_path), channels=3, dtype=tf.float32
        )[tf.newaxis, ...]
        img = cls.crop_center(img)
        img = tf.image.resize(
            img, image_size, preserve_aspect_ratio=preserve_aspect_ratio
        )
        return img
from style_image import StyleImage
import typer

app = typer.Typer()


def style_image_callback(value: str):
    style_urls = dict(
        kanagawa_great_wave="https://upload.wikimedia.org/wikipedia/commons/0/0a/The_Great_Wave_off_Kanagawa.jpg",
        kandinsky_composition_7="https://upload.wikimedia.org/wikipedia/commons/b/b4/Vassily_Kandinsky%2C_1913_-_Composition_7.jpg",
        hubble_pillars_of_creation="https://upload.wikimedia.org/wikipedia/commons/6/68/Pillars_of_creation_2014_HST_WFC3-UVIS_full-res_denoised.jpg",
        van_gogh_starry_night="https://upload.wikimedia.org/wikipedia/commons/thumb/e/ea/Van_Gogh_-_Starry_Night_-_Google_Art_Project.jpg/1024px-Van_Gogh_-_Starry_Night_-_Google_Art_Project.jpg",
        turner_nantes="https://upload.wikimedia.org/wikipedia/commons/b/b7/JMW_Turner_-_Nantes_from_the_Ile_Feydeau.jpg",
        munch_scream="https://upload.wikimedia.org/wikipedia/commons/c/c5/Edvard_Munch%2C_1893%2C_The_Scream%2C_oil%2C_tempera_and_pastel_on_cardboard%2C_91_x_73_cm%2C_National_Gallery_of_Norway.jpg",
        picasso_demoiselles_avignon="https://upload.wikimedia.org/wikipedia/en/4/4c/Les_Demoiselles_d%27Avignon.jpg",
        picasso_violin="https://upload.wikimedia.org/wikipedia/en/3/3c/Pablo_Picasso%2C_1911-12%2C_Violon_%28Violin%29%2C_oil_on_canvas%2C_Kr%C3%B6ller-M%C3%BCller_Museum%2C_Otterlo%2C_Netherlands.jpg",
        picasso_bottle_of_rum="https://upload.wikimedia.org/wikipedia/en/7/7f/Pablo_Picasso%2C_1911%2C_Still_Life_with_a_Bottle_of_Rum%2C_oil_on_canvas%2C_61.3_x_50.5_cm%2C_Metropolitan_Museum_of_Art%2C_New_York.jpg",
        fire="https://upload.wikimedia.org/wikipedia/commons/3/36/Large_bonfire.jpg",
        derkovits_woman_head="https://upload.wikimedia.org/wikipedia/commons/0/0d/Derkovits_Gyula_Woman_head_1922.jpg",
        amadeo_style_life="https://upload.wikimedia.org/wikipedia/commons/8/8e/Untitled_%28Still_life%29_%281913%29_-_Amadeo_Souza-Cardoso_%281887-1918%29_%2817385824283%29.jpg",
        derkovtis_talig="https://upload.wikimedia.org/wikipedia/commons/3/37/Derkovits_Gyula_Talig%C3%A1s_1920.jpg",
        amadeo_cardoso="https://upload.wikimedia.org/wikipedia/commons/7/7d/Amadeo_de_Souza-Cardoso%2C_1915_-_Landscape_with_black_figure.jpg",
    )
    if value in style_urls:
        return style_urls[value]
    return value


@app.command()
def main(
    style_image: str = typer.Option(
        ..., "--style_image", "-s", callback=style_image_callback
    ),
    content_image: str = typer.Option(..., "--content_image", "-c"),
    output_image_size: int = typer.Option(384, "--output_image_size", "-sz"),
    output_image_path: str = typer.Option("stylized_image.png", "--output_image_path", "-o"),
):
    style_image = StyleImage(style_image)
    stylized_image = style_image.transfer(content_image, output_image_size=output_image_size)
    stylized_image.save(output_image_path)
Notice that if you want to execute the main.py file or any other file/script using the python environment you just created, you need to run the command poetry run python main.py. So, poetry knows that you are running the main.py file with the python environment created for the style_image package.
If you feel more comfortable running python main.py, instead of running poetry run ... you can permanently activate the environment running the command poetry shell.. So it will be activated for all the commands you run.
Poetry and pyenv are integrated with visual studio code and Pycharm. In fact, they will automatically recognize the python environment created by poetry.
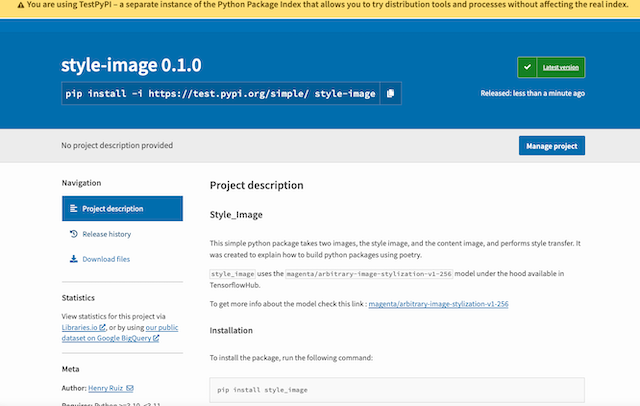
Publishing our package to PyPi
Publishing our package in Pypi should be straightforward. We just run the poetry publish command. Since this is just a demo, we are going to publish our package to the pypi test repository https://test.pypi.org/. However, the steps should be the same in production https://pypi.org/.
If the publish command is successful, you will be able to find the package in the testpypi repository.
That is all!! We are done!!. You can check the links below for more information about poetry.
Thanks for your support and don't forget to share,
Some useful resources
- Poetry Documentation
- Pyenv Documentation
- Great talk about poetry
- Package Python Projects the Proper Way with Poetry
- Poetry: Finally an all-in-one tool to manage Python packages
- Making Python Packages Part 2: How to Publish & Test Your Package on PyPI with Poetry
- Publishing to a private Python repository with Poetry
- Python Virtual Environments tutorial using Virtualenv and Poetry
- The Nine Circles of Python Dependency Hell
- Get started with pyenv & poetry. Saviours in the python chaos!
References